The Menu Planner is a tool to help you plan the profitability of both existing and new menus you provide. You can group recipes into one seasonal menu and also import your sales mix to see how each recipe contributes to your total cost of sales. You can then export reports to show the financial implications of any decision before you change your menu.
The tool enables you to add new recipes and change existing ones without affecting live data. You can even add ‘temporary’ ingredients before you have full supplier details set up on the system so you can still use them to work out the cost of a dish.
To access the Menu Planner, you need to have access to Stock Admin, the ‘Menus’ page can be found on the left-hand side just below the ‘Recipes’ page.
Creating a New Menu
-
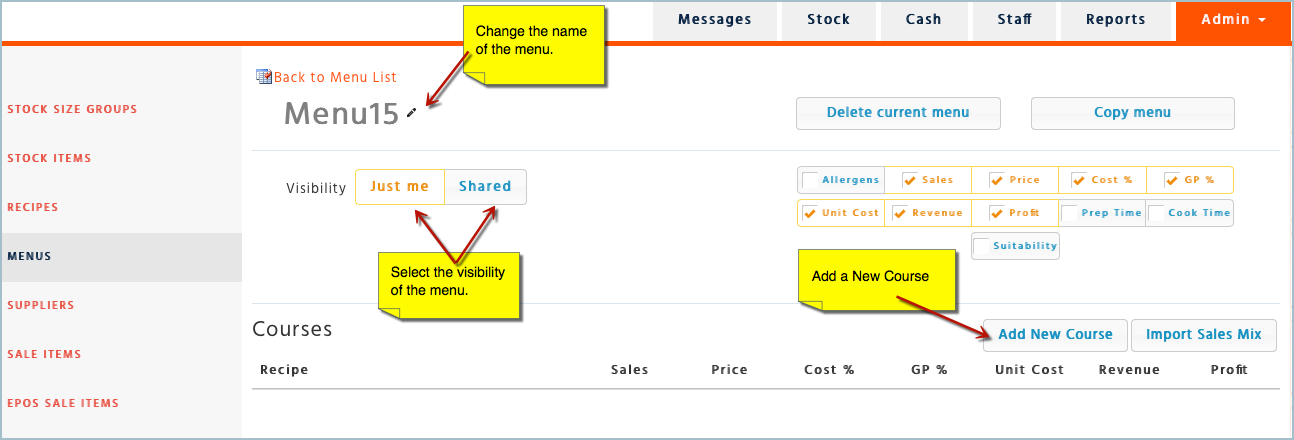
Select 'Add New Menu'
-
Change the name of the menu by selecting the pencil to edit the name.
-
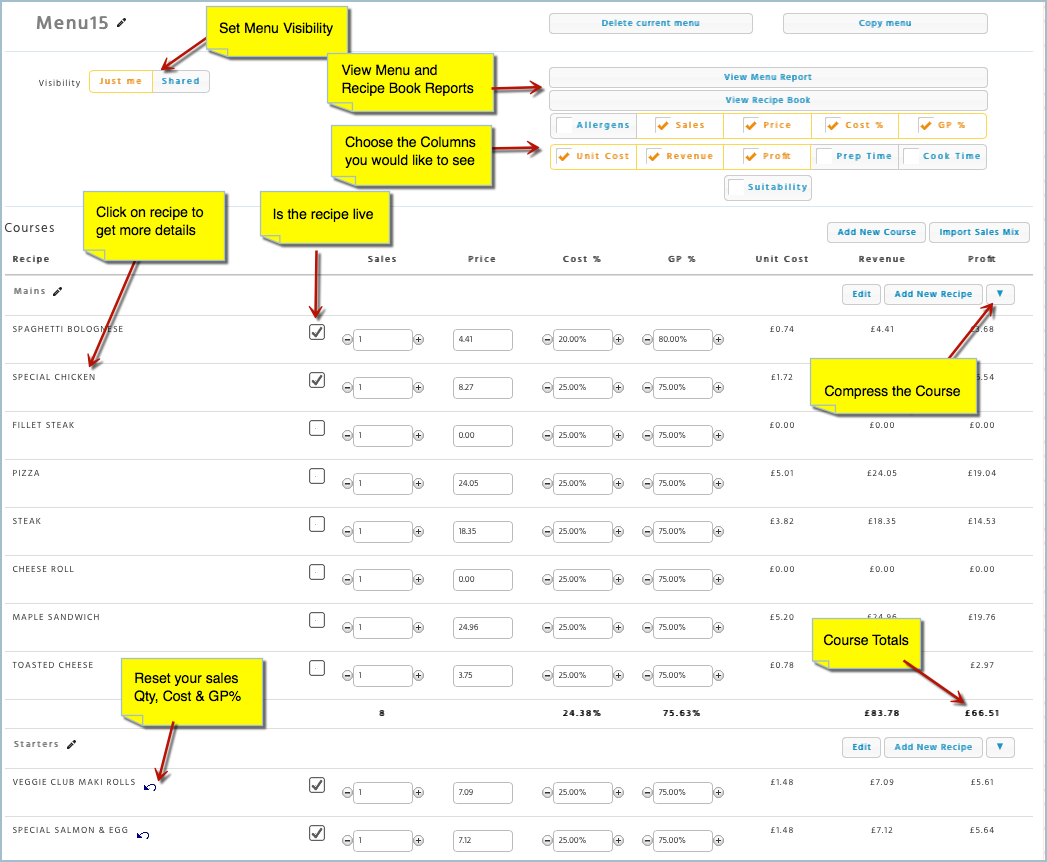
Select the 'Visibility' of the menu. Sharing the menu will allow it to be visible to other users. Selecting “Just me” will keep the menu visible only to yourself.
-
Select 'Add New Course'
Creating a Course
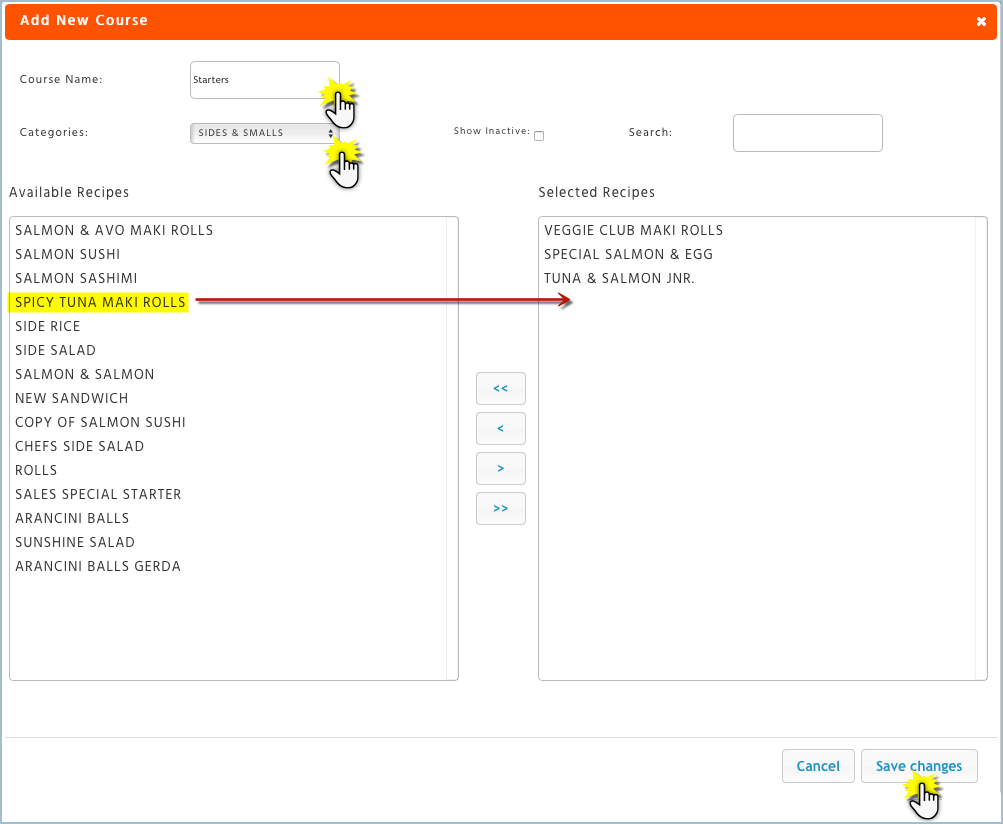
This is where you can add existing recipes in your database to a menu.
-
Once you have selected a new course, enter a course name
-
Select the recipe category that the recipes belong to, i.e. ‘Starters’ or ‘Sides and Smalls’
-
Select the recipes from the left and move them to right to make the selection
-
Save your changes
You can look for recipes in all categories by using the ‘Search’ field
Adding a Recipe to a Course
-
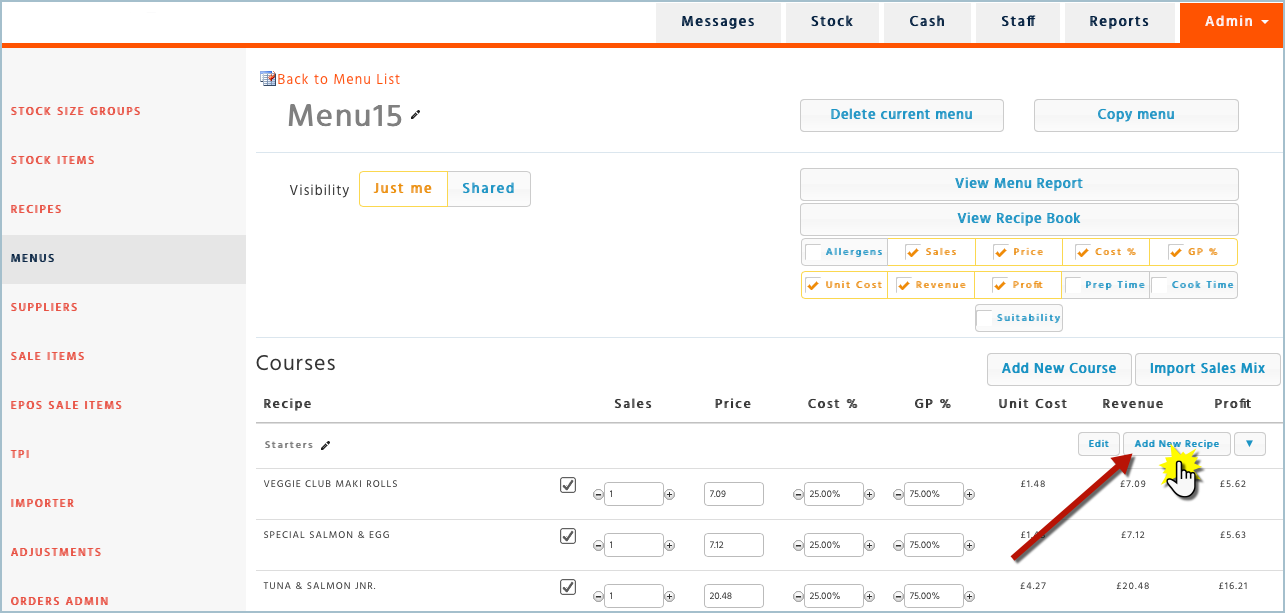
Select “Add New Recipe” to the course you would like to add it to.
-
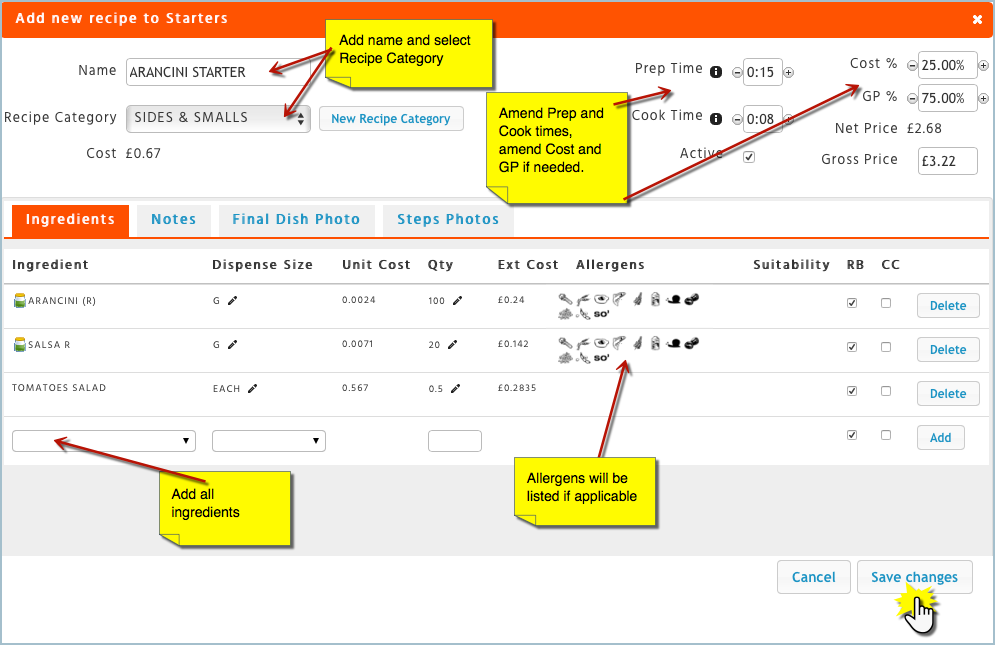
Add a recipe name and the category that this recipe belongs to.
-
Add your ingredients.
-
Amend your ‘Cook Time’ and ‘Prep Time’ to the recipe.
-
Amend your ‘Cost %’ or ‘GP%’ according to what your targets are, you can also amend the ‘Gross Price’ to view alternative costing.
-
Flag the ingredient to be included in the recipe or not. RB = Recipe Book
-
Allergens will be displayed if there are any present for that ingredient.
-
Once you have finished creating your recipe you MUST select ‘Save Changes’
Adding a Temporary Stock Item to a Recipe
A temporary stock item is one that you don’t have the full information for and has not been set up on the database yet, therefore you need to create a temporary stock item that can be used to add to your recipe which will allow you to obtain an accurate costing.
-
Enter the text of the new item you would like to add. The system will then decide if the item exists or not, if it doesn’t it will attempt to create a ‘Temporary Stock Item’
-
Select ‘Yes’ to create the temporary item
-
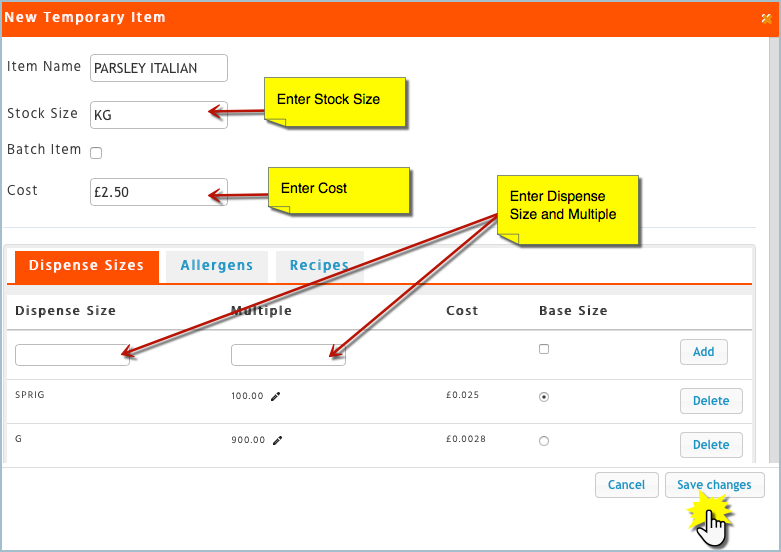
Enter the ‘Item Name’
-
Enter the ‘Stock Size’ – remember to make this a generic size such as ‘KG’ or ‘LT’
-
Enter the ‘Cost’ of the item i.e. costs £2.50 for a KG of Parsley
-
Enter the ‘Dispense Size’ name i.e. sprig
-
Enter the ‘Multiple’ i.e. there are 100 Sprigs in one KG and select ‘Add’
-
Before you save your changes, you can also add in ‘Allergens’ as well as ‘Suitability’ to the temporary item.
-
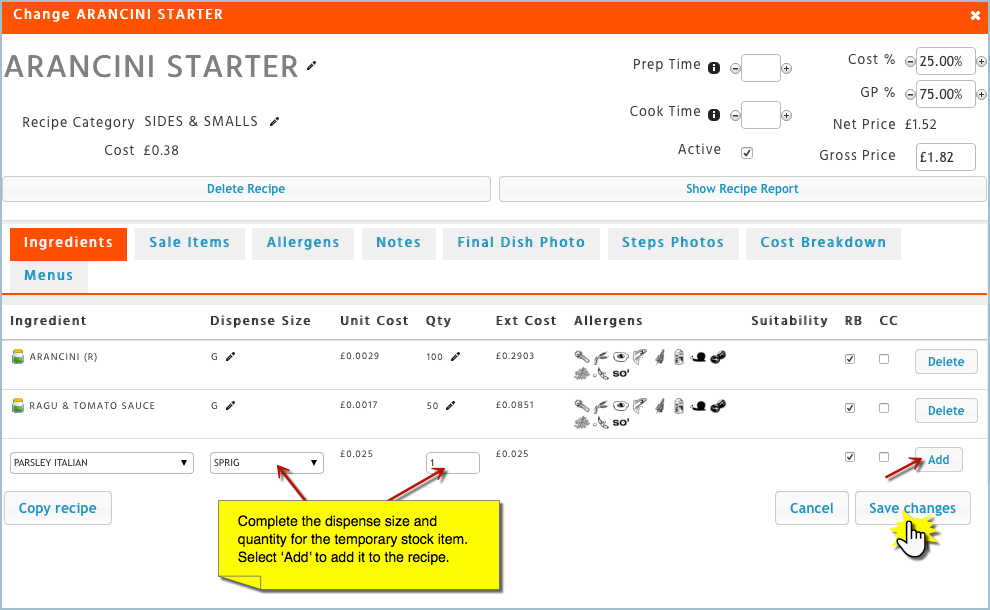
Click on ‘Save Changes’ and then add the temporary item to the recipe including the quantity (Qty) and click on ‘Add’
-
The Item will have an
 icon preceding the name indicating it is a temporary item
 -
Save your changes to the recipe

Viewing Temporary Stock Items
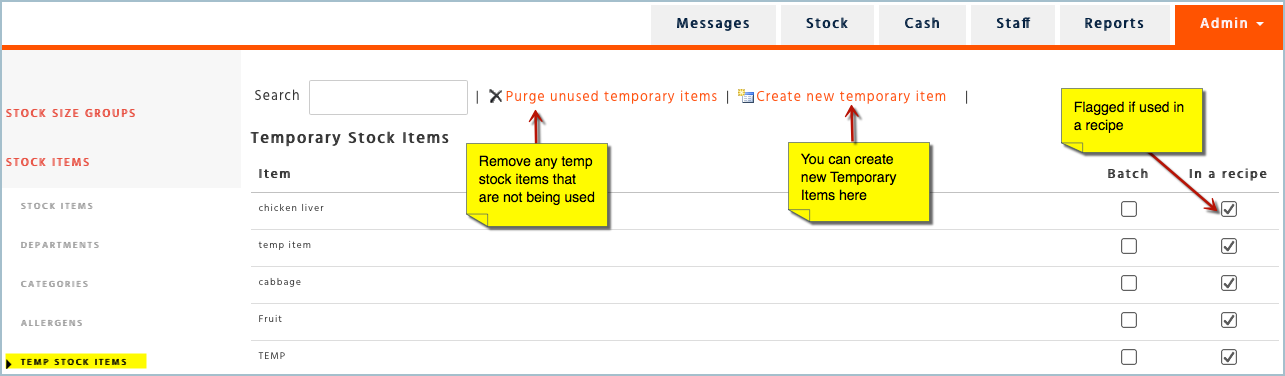
If you would like to view all your temporary stock items, you will need to navigate away from ‘Menus’ and go into ‘Stock Items’. Select ‘Temp Stock Items’, this shows you all the temporary items that you have created within all menus.
On the right-hand side “In a Recipe” will show you what temporary items are being used in any recipe.
If you would like to remove any temporary stock items that are not being used in any menu, selecting “Purge unused temporary items” will remove these items from this list.
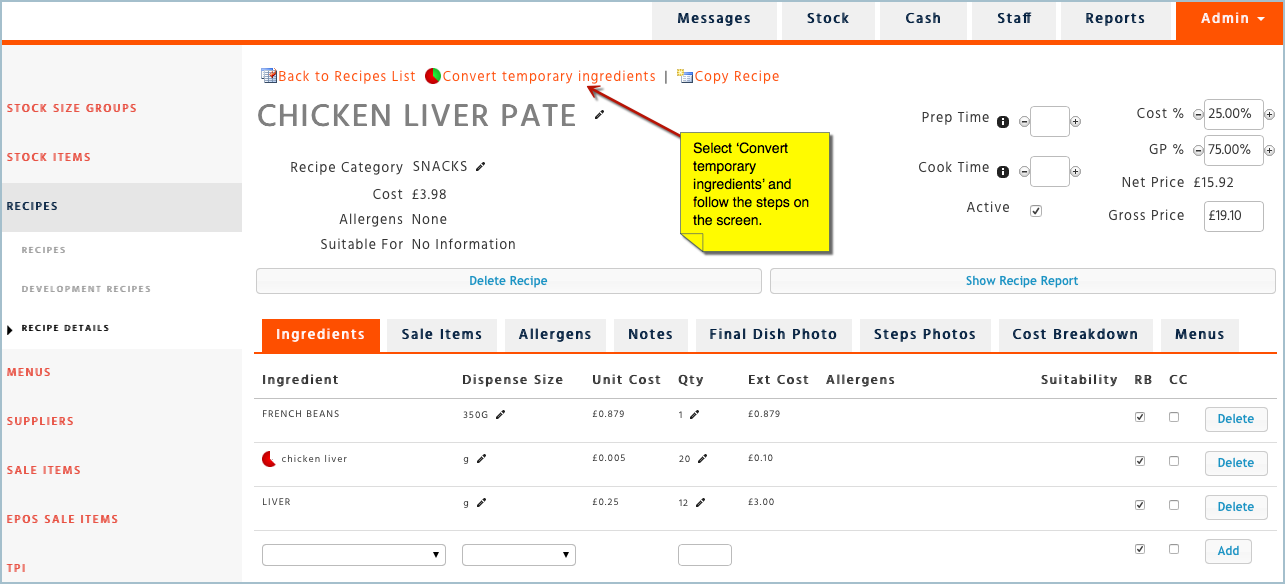
Recipes List with Temporary Stock Items
Under ‘Recipes’ select ‘Development Recipes’. This list will show which recipes are using temporary items.
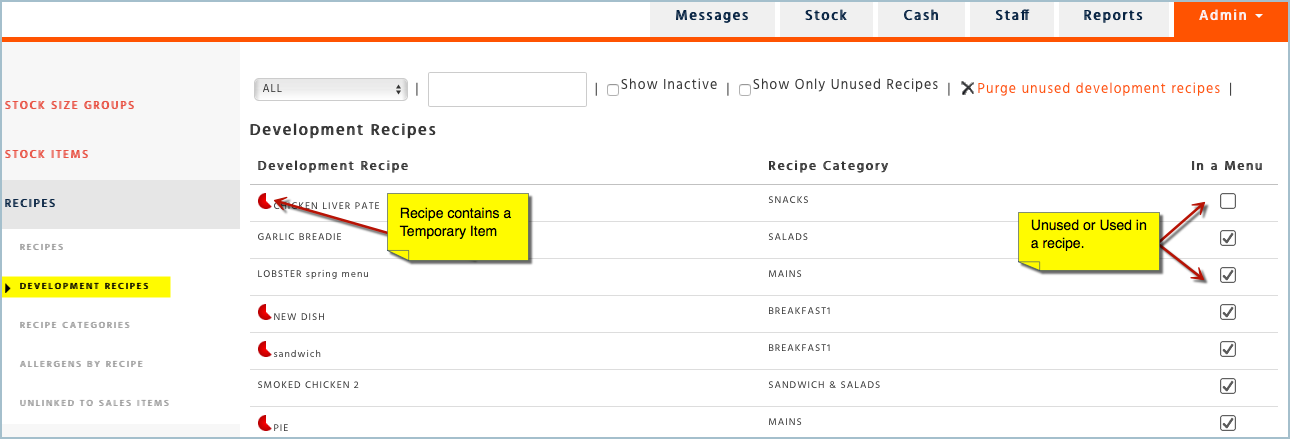
Once all the information has been received from your supplier temporary stock items can be converted into live stock items. Select a recipe with a temporary stock item, select ‘Convert Temporary Ingredients’ and follow the instructions on screen.
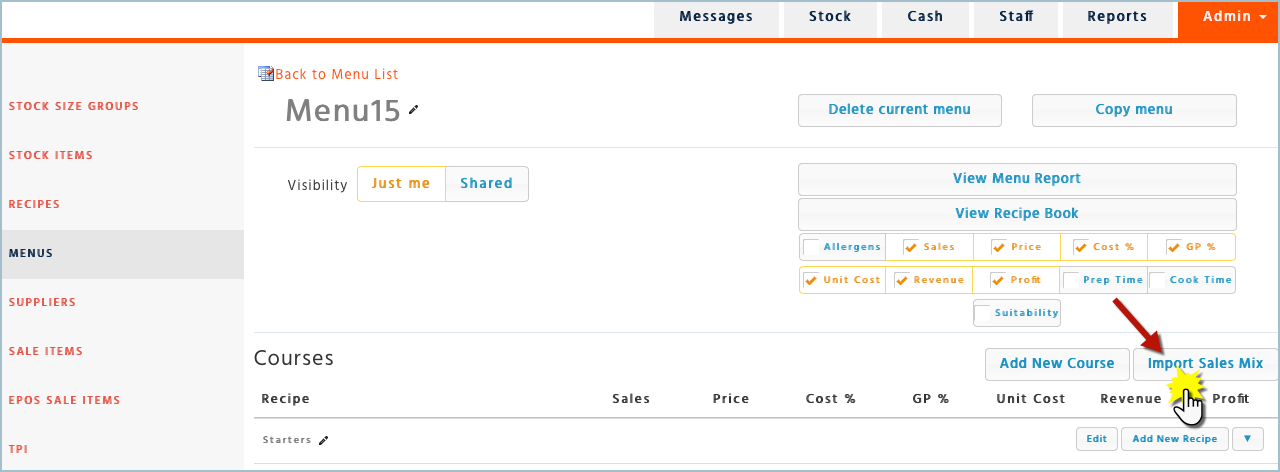
Importing an Existing Sales Mix
Here you can add an existing sales mix into a menu, this can be used to give you a more realistic expectation of how the menu will sell. You cannot import a sales mix for new recipes, but you can edit the sales manually. Select ‘Import Sales Mix’
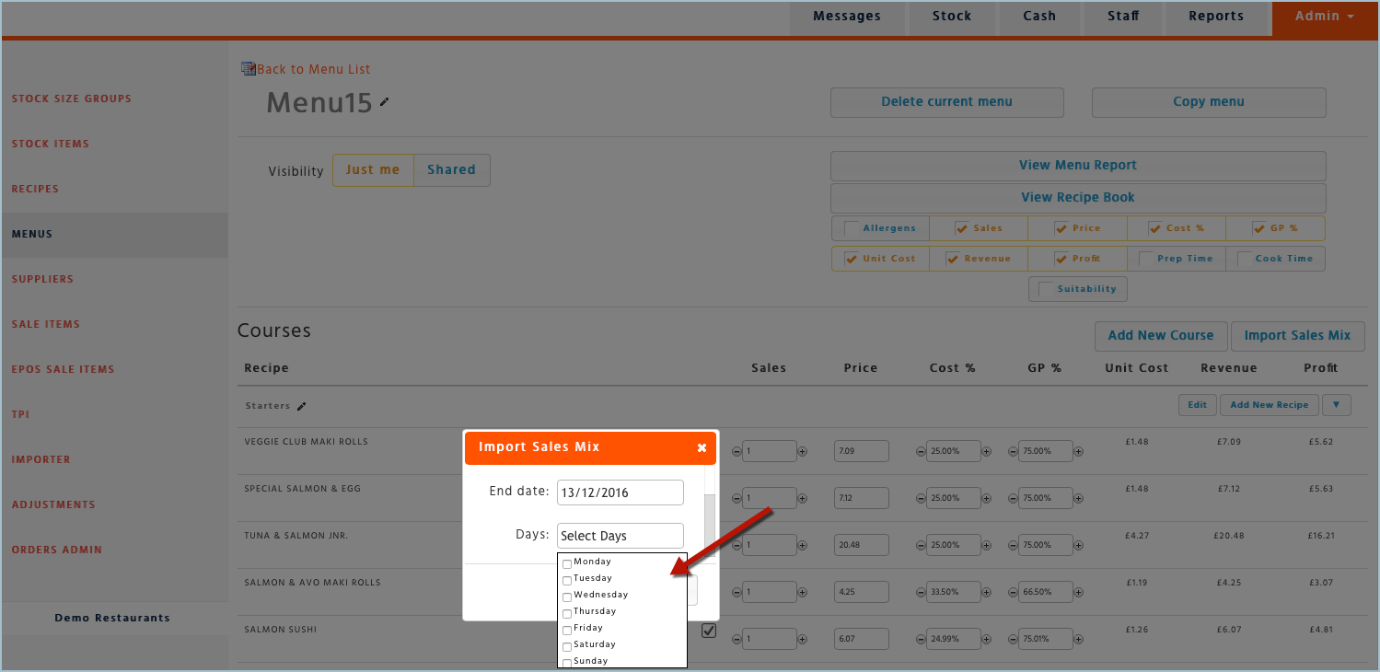
-
Choose the date range you want to import data for and click on ‘OK’
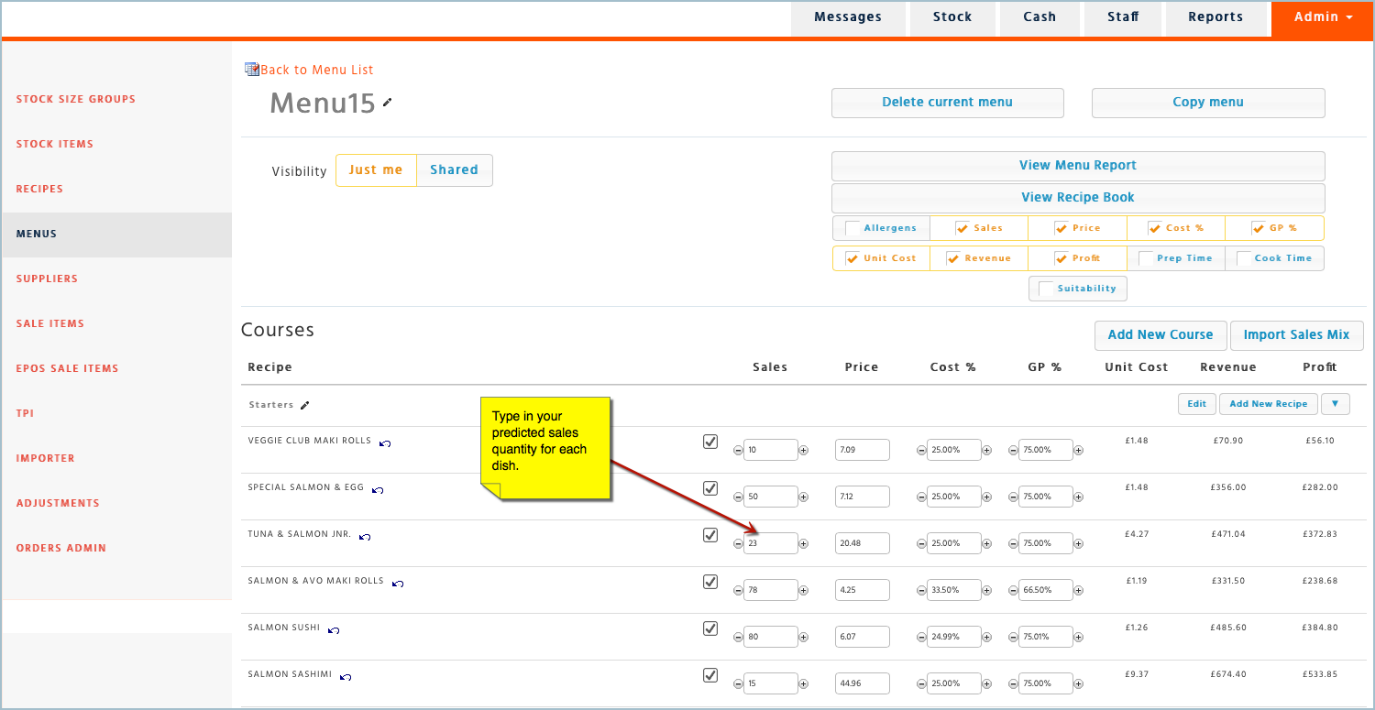
-
Add your sales quantity for the new recipes under ‘Sales’
Viewing Results
-
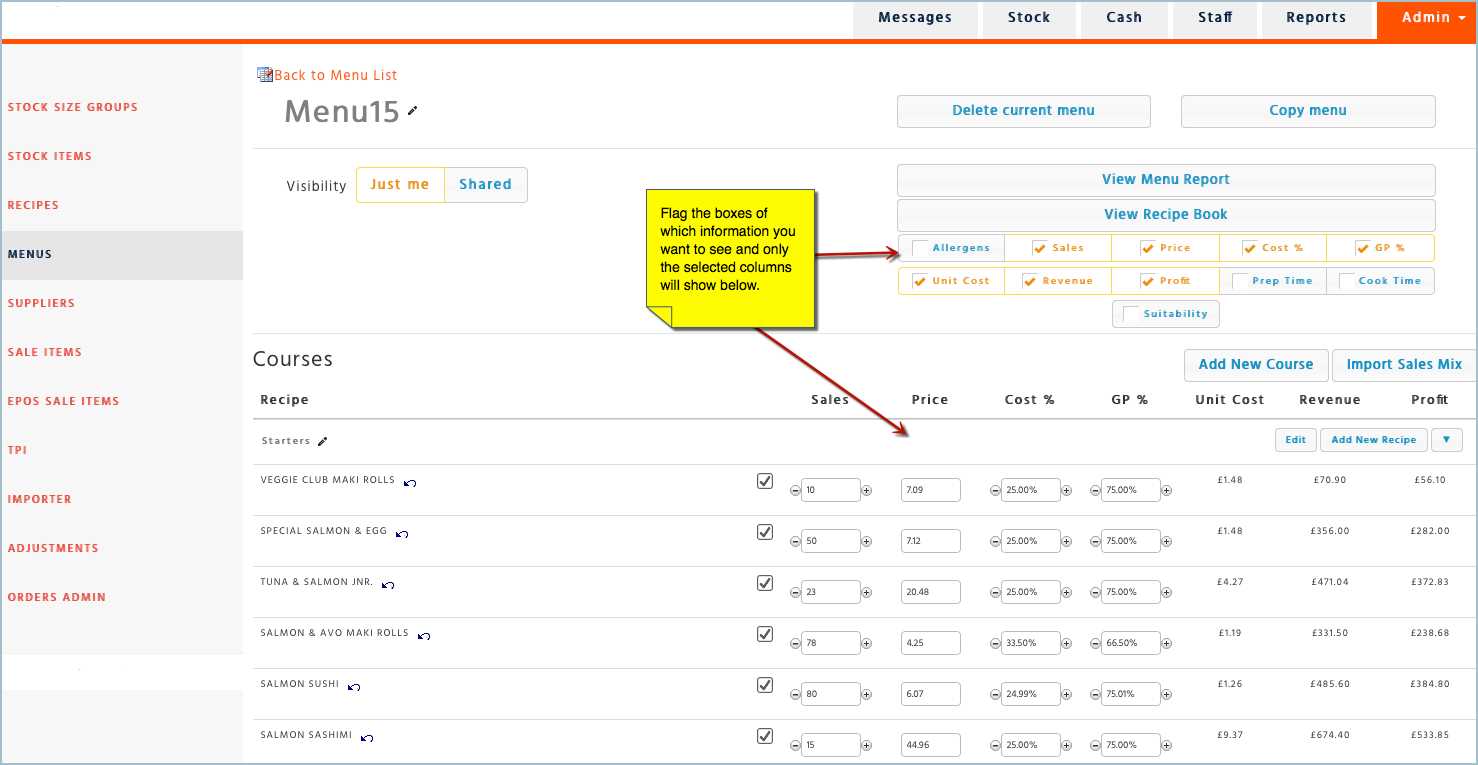
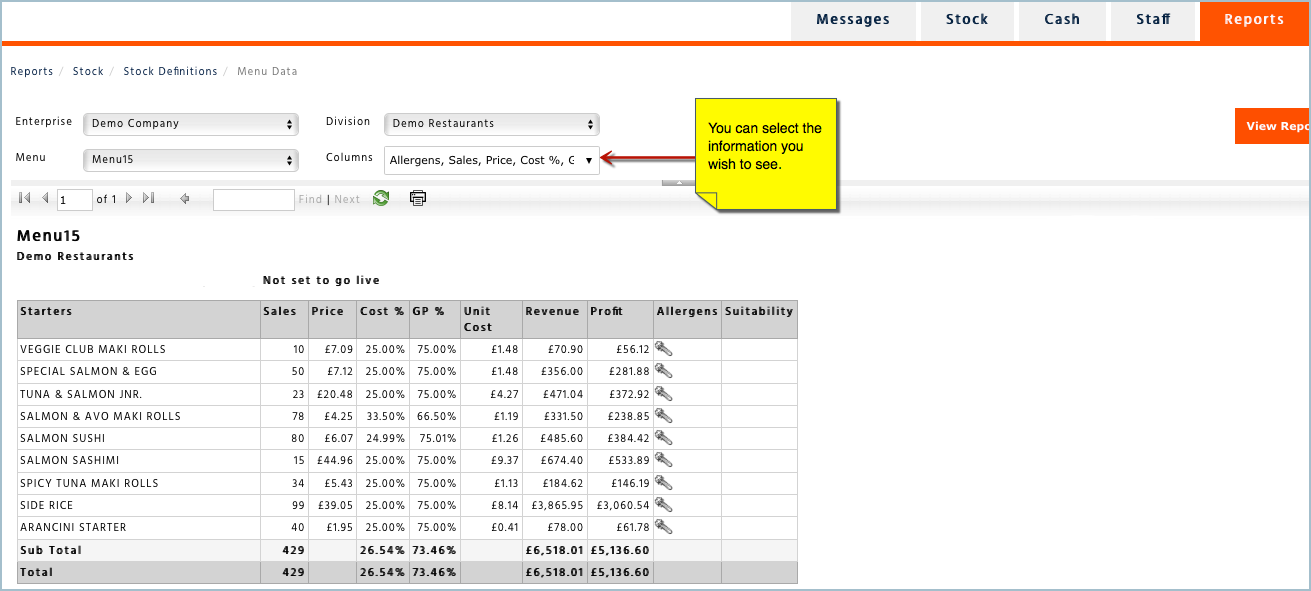
The menu allows you to edit the columns you would like to view.
-
You can compress each course by selecting the downward pointing blue arrow in the course header
-
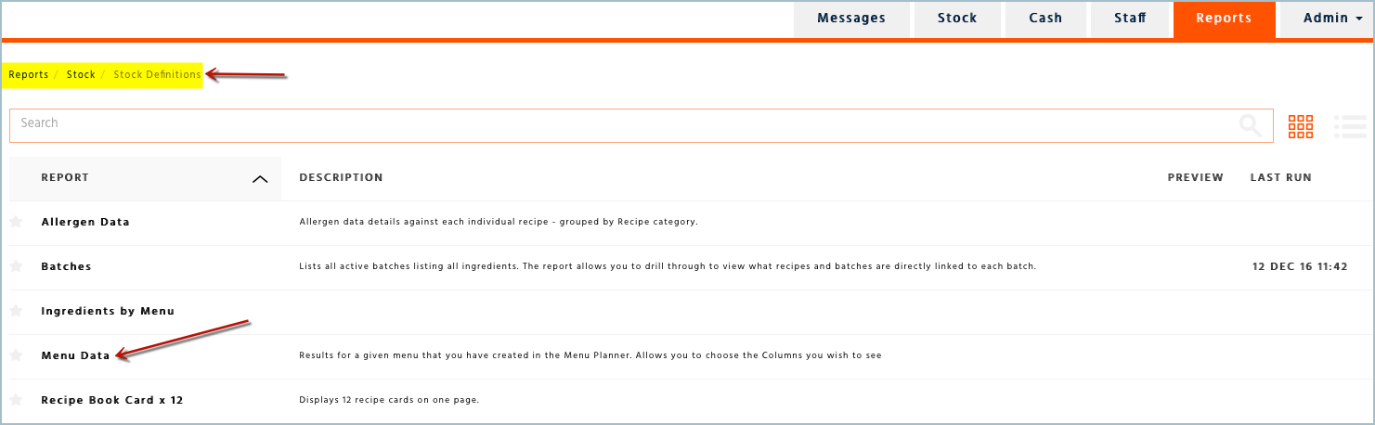
You can view your menu results report by selecting on ‘View Menu Report’ or by going into the ‘Reports’ section of the website, Reports – Stock – Stock Definitions – Menu Data
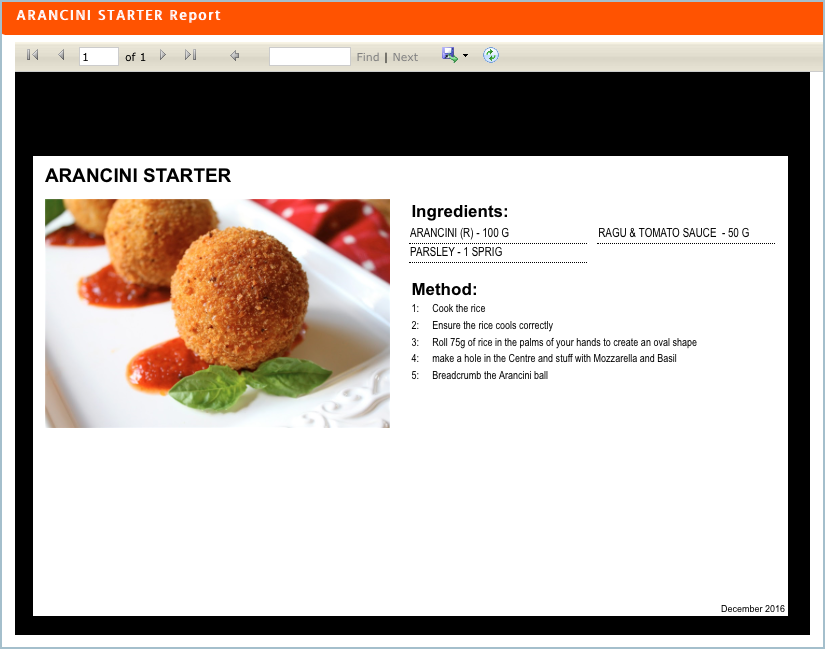
Creating a Recipe Book Page
Once you have created a menu, you will then be able to create a recipe book page.
-
Select your menu
-
Select the recipe you would like to create a recipe book page for.
-
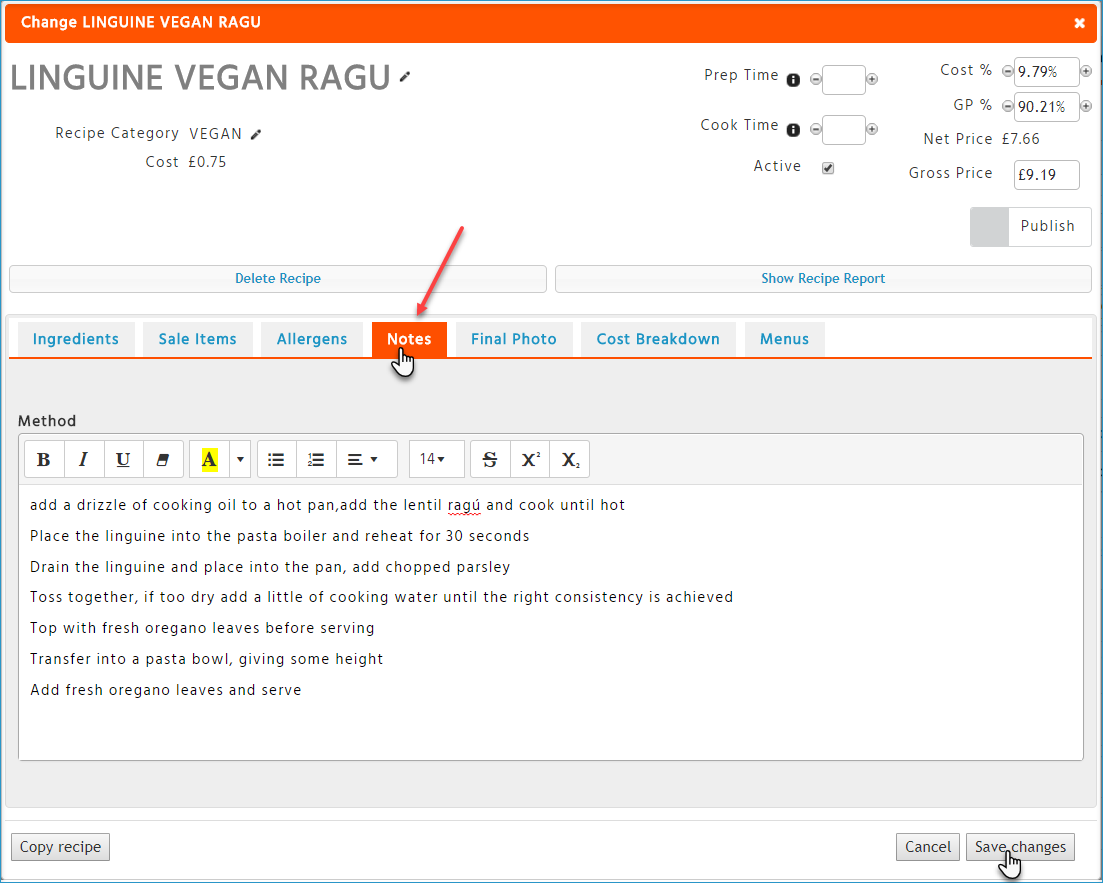
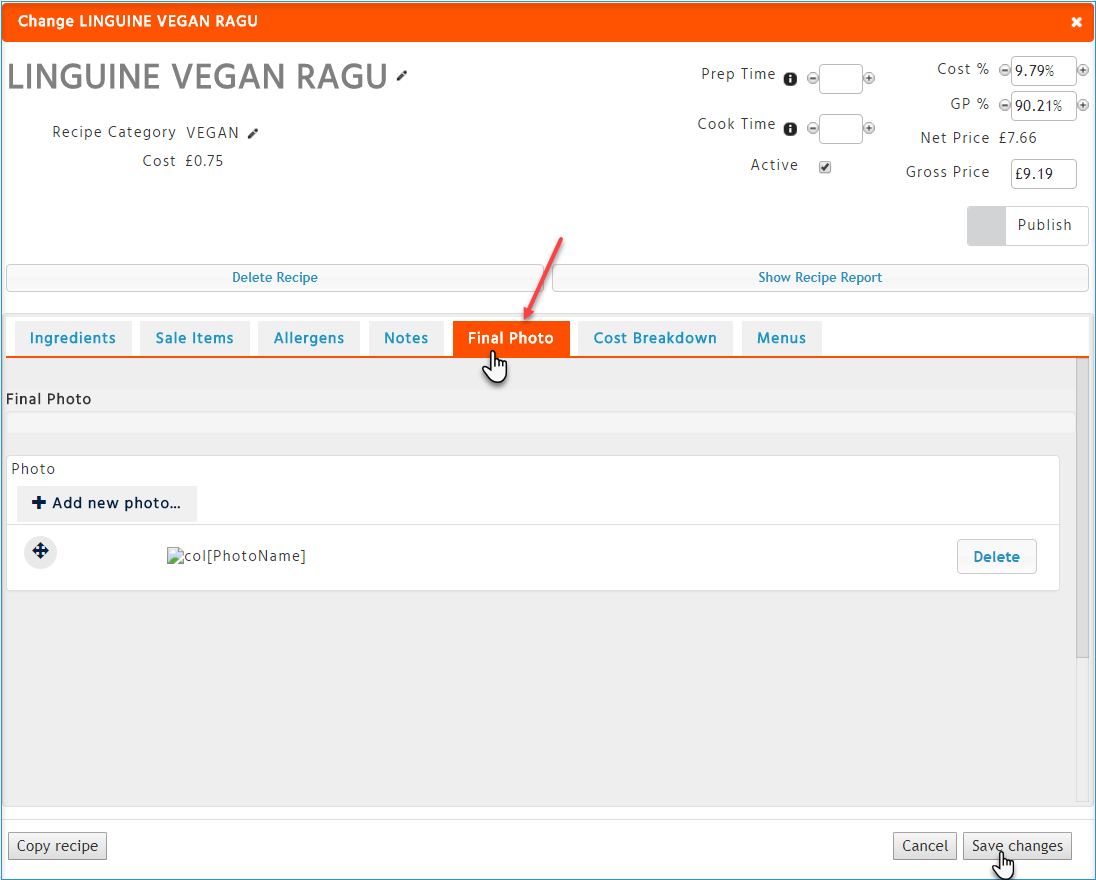
Click on the ‘Notes’ tab
-
Add your notes under ‘Method’
-
Select the third tab ‘Final Photo’ and upload your photo, once all done select ‘Save Changes’
-
To view the Recipe book page you will need to go back into the recipe and select ‘Show Recipe Report’
Understanding Your Menu
Suitability:
Suitability for can only be accurate if every ingredient of every recipe has been rated.
If there is one ingredient within a recipe that has not been rated, we will consider that recipe not suitable for any types.